
March 31, 2011
Paper towel roll added in the head compartment
Well it's modest - just a new paper towel holder in the head. In the future this may be converted to a metal towel rod. For now, it's another pleasant improvement.
Serious work begins in the aft port berth
Taking the old headliner out of the port aft berth was just the beginning. The next thing that was done, was removing both portholes and sealing them with butyl tape, then reinstalling them. That sealed them very well. But the water damage over the years had taken a serious toll on the wood. The vertical wall at the aft-most portion will have to be removed. Yesterday, Barry used a jigsaw to cut out and remove the badly rotted horizontal portion at the aft-most part, an approximately 26" by 39" section. (Since it narrows toward the stern, it's 38" wide in the back and 40" wide in the front.). Here's how the berth looked before his work yesterday:
Here's the plank he removed ... notice that someone (another liveaboard neighbor) actually had put his fist through the wood, it was so rotted! The rotten area was right in the middle. The cutout circle was where the viewport/access port had been. Barry saved the port fixture (called a screw-in deck plate) to re-use with the replacement wood he'll install.
Here's how the berth looks after that cut-out. We debated whether to change the configuration and use of that space. But it seems to be an intentional bouyancy chamber, which can be very important of course. So we'll keep it that way. We plan for Barry to install a replacement piece of wood by using exterior grade 3/4" plywood (same thickness as the original), slightly larger than the space. He'll paint the bottom, cut out the circular hole for the access port, then screw it into place. We decided to accept the difference in height of that surface (especially since it'll be used as a workroom and utility room rather than a berth), in order to get the greater stability and strength from the support at the edges. The alternative of trying to inset the new piece would be too challenging to do with enough support, without more complication (new support pieces, for example). (There already is a mini-bulkhead support wall underneath the horizontal platform, slightly aft of where the water tank storage area sits.). Once it's in place, he'll do the final install of the access port, and seal the whole new board with a little Fiberglas and resin, so the bouyancy chamber can be airtight. (Then the whole platform can be repainted, as the starboard aft berth was!)
April 1 update: as the below photo shows, Barry bought the new plywood, cut it (including the circle in the horizontal board), and both the horizontal and vertical boards are positioned as shown here. This weekend we'll be painting, putting up insulation on the outer hull wall, and installing the painted plywood. Oh - and doing some sailing of course! As a side note - we are using exterior grade plywood. It's much better than standard interior plywood, which should never be used onboard. It's less expensive that outright "marine grade" plywood. The book, "This Old Boat" says that exterior grade plywood can be used in most boat applications, so we're going with it for these interior spaces. The difference is the marine grade has no spaces at all within in; the exterior grade does have protection against rot in the inner layers, unlike interior grade which doesn't have that protection built into the inner layers. We're mitigating risk by using either polyurethane or paint on the wood/plywood that's in the boat (both new and existing).

Here's the plank he removed ... notice that someone (another liveaboard neighbor) actually had put his fist through the wood, it was so rotted! The rotten area was right in the middle. The cutout circle was where the viewport/access port had been. Barry saved the port fixture (called a screw-in deck plate) to re-use with the replacement wood he'll install.

Here's how the berth looks after that cut-out. We debated whether to change the configuration and use of that space. But it seems to be an intentional bouyancy chamber, which can be very important of course. So we'll keep it that way. We plan for Barry to install a replacement piece of wood by using exterior grade 3/4" plywood (same thickness as the original), slightly larger than the space. He'll paint the bottom, cut out the circular hole for the access port, then screw it into place. We decided to accept the difference in height of that surface (especially since it'll be used as a workroom and utility room rather than a berth), in order to get the greater stability and strength from the support at the edges. The alternative of trying to inset the new piece would be too challenging to do with enough support, without more complication (new support pieces, for example). (There already is a mini-bulkhead support wall underneath the horizontal platform, slightly aft of where the water tank storage area sits.). Once it's in place, he'll do the final install of the access port, and seal the whole new board with a little Fiberglas and resin, so the bouyancy chamber can be airtight. (Then the whole platform can be repainted, as the starboard aft berth was!)

April 1 update: as the below photo shows, Barry bought the new plywood, cut it (including the circle in the horizontal board), and both the horizontal and vertical boards are positioned as shown here. This weekend we'll be painting, putting up insulation on the outer hull wall, and installing the painted plywood. Oh - and doing some sailing of course! As a side note - we are using exterior grade plywood. It's much better than standard interior plywood, which should never be used onboard. It's less expensive that outright "marine grade" plywood. The book, "This Old Boat" says that exterior grade plywood can be used in most boat applications, so we're going with it for these interior spaces. The difference is the marine grade has no spaces at all within in; the exterior grade does have protection against rot in the inner layers, unlike interior grade which doesn't have that protection built into the inner layers. We're mitigating risk by using either polyurethane or paint on the wood/plywood that's in the boat (both new and existing).

Whole lot'a painting going on ...! in many areas of the boat
I've started painting many areas of the boat. First I'll show the paint product I'm using, recommended by one of the other live-aboards at the Ortega Yacht Club Marina. It's called Perma-White by Zinsser and it can be tinted, so I had it tinted "winter white" so it wouldn't be too glaring. I'm not sure if it comes in gloss but the salesperson at the hardware store told me that satin would be more durable (and I really wouldn't have wanted gloss anyway). It's considered a two-coat self-priming paint, meaning that it covers problem areas very well. It's quite thick, but that's understandable, and the amount needed to coat a surface varies depending on how smooth or finished (or unfinished) the surface is. Here's a photo of the paint product:

I'll add some before-and-after photos below of some of the areas where I'm using it. First, the forward-facing wall adjacent to the door entry to the head, "before" photo:

And here are two "before" photos of the forward-facing wall adjacent to the doorway into the main berth, the part of it next to the berth itself (you can even see "doodles" on there, I like to think these doodles were placed by the Performance Cruising personnel during construction ... who knows, maybe Tony Smith himself penciled some of these in!):


Here's how that area looked after the painting. I backed up a bit to get the whole area into the photo:

Here's an "after" photo of the wall adjacent to the door entry to the main berth (along the outer starboard hull):

Here's where I painted the little cubbyhole area on the starboard side, just inside the step into the main cabin from the cabin doorway. This cubbyhole is about the height of the window, and the area above the wood ledge had become badly stained over the years. This paint did a great job:

Simple meals until the galley becomes really operative
Barry got the grill fired up, the one that's on the port stern rail. He grilled hamburgers and hot dogs so far (actually the dogs are polska kielbasa, yum!). A couple of times I've gotten Chinese food takeout, which reheats well for leftovers using a small "rice cooker" I bought for cheap ($13) at CVS. This little rice cooker has the ability to also cook up stews, and items can be reheated either directly in the removable cooking bowl or wrapped in foil and placed in the bowl with about an inch of water. When that water boils, the item in foil is nicely heated up. The rice cooker uses up to about 700 watts (if my memory is right), and it certainly does not blow out the AC breaker on our 30-amp shore power. We're also using a "hot pot" ($15) also from CVS - mainly for boiling water but it can also simmer up soups, chili, and similar liquid-based foods. It uses up to 1000 watts and doesn't require going beyond the low settings in order to get liquids to boiling in a real hurry.
Our new acquisition as of yesterday is a "NuWave" oven (yes, it's as seen on TV, LOL!). Since this is for the boat, it's the "Mini" model which is smaller and uses only about 600 or 700 watts. We used it a few times for trials yesterday and it certainly did not blow out the AC breaker. We opted for it rather than a microwave, because the NuWave Mini promises to provide convection and infrared heating - basically, in addition to simple heating/cooking and reheating, it promises to enable baking, frying, and browning. The company provided a recipe booklet and a "free" mixer (well, for an additional $14.95 "shipping and handling" charge) which looks like it may be useful for chopping, dicing, and making pina coladas and whatnot.
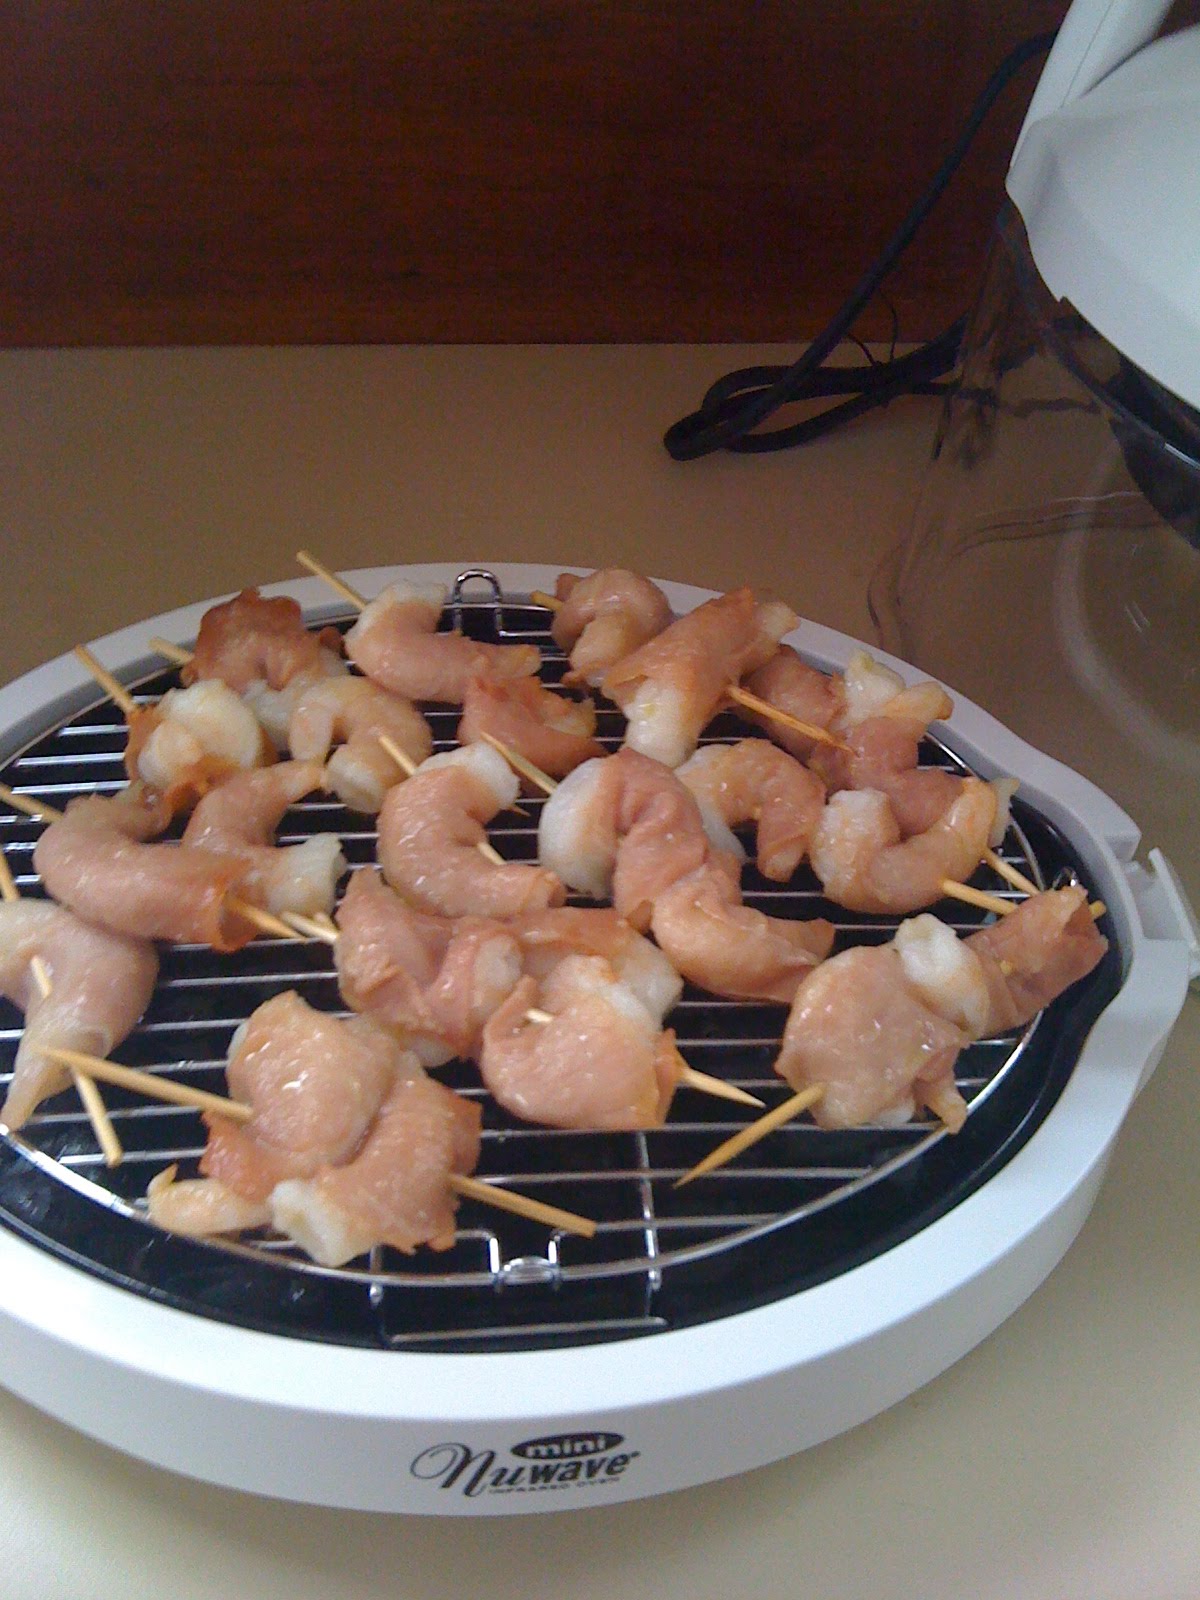
Update at 6:25 pm: here are photos of the prosciutto-wrapped shrimp appetizer Barry just cooked in the NuWave Mini. I don't mean to sound like advertising, but these do taste great!
Our new acquisition as of yesterday is a "NuWave" oven (yes, it's as seen on TV, LOL!). Since this is for the boat, it's the "Mini" model which is smaller and uses only about 600 or 700 watts. We used it a few times for trials yesterday and it certainly did not blow out the AC breaker. We opted for it rather than a microwave, because the NuWave Mini promises to provide convection and infrared heating - basically, in addition to simple heating/cooking and reheating, it promises to enable baking, frying, and browning. The company provided a recipe booklet and a "free" mixer (well, for an additional $14.95 "shipping and handling" charge) which looks like it may be useful for chopping, dicing, and making pina coladas and whatnot.


Update at 6:25 pm: here are photos of the prosciutto-wrapped shrimp appetizer Barry just cooked in the NuWave Mini. I don't mean to sound like advertising, but these do taste great!

Starboard aft berth before and after the insulating layer installed
Here are "before" and "after" photos of how the gutted starboard aft berth looked, before and after Barry installed the insulating layer that we're using (the polyethylene translucent white sheeting sold in a roll as flooring underlayment, also depicted as we've been installing it in the ceiling of the main cabin/salon).
The other changes Barry made included painting the horizontal surface, and correcting the hardware problems that had caused the fan to swing on only one of two intended screws affixing the fan to the vertical wall (you can see a little of it in the "after" picture at bottom). It's a little funny to say this, but the total effect of the painting plus insulating layer was to make a "winter wonderland" look all frosty white in the berth! Much cleaner, that's for sure.
Subsequently we put the mattress back in, with some linens, and had my cousin's daughter from Germany come visit and stay overnight in that berth. She used the little reading lamp for actually reading a book ... she considered it cozy! So - another small success onboard.


As a bonus, I'm adding a photo that shows the new insulating layer in the head compartment, as Barry had installed it along the horizontal bare-fiberglas strip (along the outer port hull). I couldn't find where I'd taken a "before" photo of this area - probably because it was so ugly-looking in the head that I didn't even think of taking any photos there when the old headliner was ripped out of it. The new insulating layer, which goes up in such a nice quick time, made the head start to look civilized again. For what it's worth, the polyethylene sheeting also has a moisture and vapor barrier laminated on both sides ... I'm not certain just how important that is, but I think I like that.

March 28, 2011
New LED light replacing original ceiling light, main berth
This light is embedded into the thick insulation that's placed up in the main berth ceiling. Partly this is a repair because the glass in one of the original cabin lights was accidentally dropped and broken. But it's also an upgrade because the LED light requires less power draw on the DC 12-volt system. Even though it's small, it's also worth noting that 12-volt power drops off more quickly in power the farther away the draw is (like the main berth light), from the battery source.


Here's how we installed the insulating layer in the cabin ceiling
Polyethylene sheeting that's sold as a flooring underlayment, and the adhesive spray 3M #90 product:
Before - the raw ceiling just inside the cabin (light unscrewed):
Spraying the 3M #90 adhesive on the ceiling's edge (and the light is upside down on Pusser's mug):
Spraying the adhesive onto the edge of the sheet:
Smoothing the leading edge of the sheet into place at the ceiling's edge:
Reinstalling the light (after cutting a slit in the sheet):
Prepping the rest of the two surfaces, because the adhesive must be sprayed on both sides, then wait a minute or two before pressing the sheet onto the ceiling:
Smoothing the rest of the sheet up onto the ceiling panel:
Trimming the overlapped areas:
The result was the much nicer look of the polyethylene sheeting (almost like a bandage!) smoothed over the nasty-looking raw surface that had been left after ripping down the old headliner. We realize that installing the new headliner fabric will be much more challenging. But it's great to have the cleaner-looking intermediate layer in place.

Before - the raw ceiling just inside the cabin (light unscrewed):

Spraying the 3M #90 adhesive on the ceiling's edge (and the light is upside down on Pusser's mug):

Spraying the adhesive onto the edge of the sheet:

Smoothing the leading edge of the sheet into place at the ceiling's edge:

Reinstalling the light (after cutting a slit in the sheet):

Prepping the rest of the two surfaces, because the adhesive must be sprayed on both sides, then wait a minute or two before pressing the sheet onto the ceiling:

Smoothing the rest of the sheet up onto the ceiling panel:

Trimming the overlapped areas:

The result was the much nicer look of the polyethylene sheeting (almost like a bandage!) smoothed over the nasty-looking raw surface that had been left after ripping down the old headliner. We realize that installing the new headliner fabric will be much more challenging. But it's great to have the cleaner-looking intermediate layer in place.
March 06, 2011
Base for wiring diagrams (AC and DC)
Here's the "base" for the AC and DC wiring diagrams that we plan to make for Cay Player. Barry already started to modify this from a stock Performance Cruising diagram for the Gemini 3200, by starting to remove some of the non-essential details. Once we get this base diagram more simplified, then we'll trace the wiring patterns onto it. One for the AC, and one for the DC.
*NOTE: he finished making it more simplified - that additional diagram for the base diagram, is now the first one below:
*NOTE: he finished making it more simplified - that additional diagram for the base diagram, is now the first one below:


Curtain fixture closeup
I removed the plastic curtain "rods" that were across the wooden trim atop most of the windows. It included the horizontal pieces plus plastic snaps for the curtain tops to attach to (my sister is graciously making new curtains for us). Even though the window sides still look raw from the headliner removal project, the windows and trim look much better without those old plastic pieces! Below are before and after photos:


New headliner insulation for some areas
We're trying a different product for headliner insulation in the salon and head. It's a moisture-proof polyurethane that's thin, flexible, and sold in large white rolls as a flooring underlayment in the hardware store (Lowe's, at least). The immediate advantages are that it's easy and fast to put up, covering the ugly scarred expanse of ceiling left from removal of the prior headliner; with spray adhesive (3M number 90). Also, any moisture won't soak into it. We'll see how it performs over time. Next, we'll reseat all items such as window screws on the upper deck using sealant in order to prevent or minimize leaks. We already started that with sealant at the base of the mast yesterday. Then, maybe next weekend or otherwise the one after that, we can install the new headliner fabric in the main berth and salon. We'll test to see if we can use the spray adhesive (it's quite strong), or must use the Contact Cement (gelled product in a can, brushed on thickly), for the headliner fabric. A different approach will be used in the head. I want to find a good vinyl to cover the insulation-covered areas (mostly Fiberglas exterior walls), or maybe a flexible hard surface that's easy to clean and will stand up to showering. Then, for the inside face of the entry wall, white paint (or hardboard), also impervious to shower spray. And for the nice wood wall behind the sink, several coats of polyurethane for a waterproof (at least water resistant) attractive wood surface.


Subscribe to:
Posts (Atom)
